The step overview lists all steps of the instances for which you, as process owner, are responsible. If you have appropriate rights as process owner you may execute various step actions.
Click on step overview under Admin Tools in the JobRouter navigation menu to get a list of all steps in the system.

Schrittübersicht
Each row is colored. The color displays the status of a instance. The color key can be found below the filter. More information about the meaning of the default colors in JobRouter can be found in chapter Color management in JobRouter.
If you click on a row, the step will be opened in a new pop-up window. Depending on your authorization, the user steps will be displayed as read-only or editable.
The following step properties are displayed in the overview:
Property |
Definition |
|---|---|
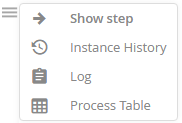
Context menu
|
This menu displays all information about each step:
•Show step- The step is opened •Instance history- all steps that have been already processed during the instance of the respective step or that are still active are listed in a new pop-up window. For further information see chapter Instance history. •Log - the activity of the step is displayed in a pop-up window (e.g. the step was canceled or postponed). •Process table - all values from the process table and subtables are listed in a pop-up window. This function is not available for steps from an instance archive. |
Step status |
A symbol indicates the status of the step. |
Process |
Process name |
Instance |
When you start the process again, the appropriate instance will automatically receive a new number. This number is unique and allows you to identify every instance of a process. |
Step number |
The number of the step within the process. |
Step |
Step label, if recorded. |
Summary |
A summary of the instance content which is defined in the process properties. |
Job Function |
The Job Function the step is directed to. |
Username |
The username who is processing the step. |
Indate |
Date when the step arrived in the inbox. |
Outdate |
Date when the step ended. |
Completion time |
Date when the step was completed. |
Duration |
How long the processing of the instance took. |
Initiator |
The username of the user who started the step. |
Step actions
If you enable the checkbox for one or more instances, the Perform action menu appears in the action bar. There certain actions are available. The display of specific actions depends on the rights of the logged-on user and the status of the selected step.
Please note: The difference between Resend Step and Reactivate Step is that Resend Step will only re-execute the rules. With Reactivate Step, the system activity is also executed before the rule is executed.
Assign a step to another user or Job Function
Assign a step to another user or to another Job Function by enabling the checkbox next to the desired step in the step overview. Then select the Assignment action from the selection menu. This can only be done if you have if you are the process owner and have the rights for the performance of this action. In addition, the step should still be active.
If you have selected Assignment the following pop-up window appears:

Assign a step to a user or Job Function
Specify whether you want to assign the step to a user or Job Function. Enter a name or a Job Function in the field Username or select it via the lens icon. You can store a message in the Comment field that appears when the step will be opened. Below the comment field you see which step you have assigned. The Instance column displays which instance of a selected process it is. The Step Number displays the number of steps within the process. Under Step you may see a label of the step. Click on Assign to perform the action. The step with the corresponding information is displayed immediately in the step overview.
Change the completion time of a step
You can change the completion time of a step by enabling the checkbox next to the corresponding step in the steps overview. Select Change completion time in the Perform action menu in the action bar. You need the according process owner right to perform this action. In addition, the step should still be active.
If you have selected this action, a pop-up window appears.

Change completion time
Determine at which time (completion time) the step should be completed. For your information, step and instance number, as well as the step label are displayed. Click on Execute to adapt the new date in the list of the step overview for the selected step.
Activated steps that are no longer necessary or were started by mistake may be aborted. They are not removed from the database as they are when deleted, but are marked with the symbol ![]() as no longer active. The step will not be displayed to the user any more.
as no longer active. The step will not be displayed to the user any more.
Select the step you want to abort. If you have the appropriate process owner right, you can select Abort step in the Perform action menu in the action bar.
If the setting Audit-proof abortion of steps is activated in the General Settings, a pop-up window is displayed when a step is aborted. The entered comment appears in the Log after the step is aborted.
The step is displayed as aborted in the step overview.
Reactivate step
You may reactivate an already completed or a aborted step. The step will reappear in the inbox of the user who completed the step and can be processed again.
Enable the checkbox for the step you want to reactivate. If you have process owner right, you can choose Reactivate step in the Perform action menu in the action bar. Then the step can be edited again.
Delete step
One or more steps can be deleted by selecting the appropriate checkboxes. Select Delete in the perform action menu in the action bar. Confirm with OK. The step or steps are deleted. These steps can't be reactivated.
Please note: The deletion of steps is not logged in the general Action log. Only the deletion of an entire instance is recorded here. If an instance has several steps and a single step is deleted, the deleted step can be viewed in the Instance overview under Log. If an instance has only one step, or all steps are deleted at once, the instance itself is also deleted. The deleted instance is then logged in the general action log.